
Is Starlink Internet for Rural Areas Worth It in 2026?
Starlink internet for rural areas is absolutely worth the investment for regional and remote Australians, providing high-speed, low-latency broadband that easily outperforms traditional copper lines and older satellite services. If you are weighing up whether it is the right fit for your property, it stands out as the most reliable way to secure modern connectivity outside major cities.
Here is why it stands out:
- Speed: Median download speeds of 65–220 Mbps, compared to single-digit Mbps on ageing copper lines or congested fixed wireless
- Latency: 20–50 ms, low enough for video calls, remote work, and even online gaming
- Reliability: Greater than 99.9% average uptime, with automatic satellite switching to maintain your connection
- Coverage: Available across rural and remote Australia, including areas with no viable fixed-line alternative
- Setup: Self-installation typically takes 30 minutes to one hour with the Starlink app guiding the way
For too long, rural Australians have been stuck with a frustrating reality — slow copper lines, unreliable fixed wireless, or traditional geostationary satellite internet with latency so high it made even basic video calls painful. Families have driven to town libraries just so kids could complete homework. Farmers have managed operations with connections that cut out during storms. Remote workers have had to choose between city living and productivity.
Starlink changes that equation fundamentally. Built on a constellation of over 6,500 low Earth orbit (LEO) satellites orbiting at around 550 km above the Earth — compared to 35,000 km for traditional satellites — Starlink delivers speeds and responsiveness that were simply impossible for rural households just a few years ago.
But getting the most out of Starlink in Australian conditions isn't just about ordering a dish and pointing it skyward. Where you mount it, how you power it, and how you route the cable all make a real difference — especially in the harsh outback environment where UV exposure, extreme heat, and high winds are facts of life.
This guide walks you through everything: how Starlink works, how it compares to traditional rural broadband, how to install it properly, and how to power it efficiently off-grid using purpose-built DC power solutions.

What is Starlink and How Does It Work?
At its core, Starlink is a satellite internet constellation operated by SpaceX. However, it functions entirely differently from the satellite internet services of the past. Instead of relying on a couple of massive, sluggish satellites parked in a fixed spot high above the planet, Starlink uses a vast web of thousands of small satellites working in unison.
These satellites communicate with your home dish using phased-array antennas. These high-tech antennas can track multiple satellites moving across the sky simultaneously, seamlessly handing off the connection from one satellite to the next without you ever noticing. If you want to understand how this changes the game for regional properties, our deep-dive on Connecting the Outback explains the technology in detail.
Furthermore, the latest generations of Starlink satellites utilise advanced laser links to talk directly to each other in the vacuum of space. This means data can travel at the speed of light between satellites before dropping down to a ground station, bypassing the need for extensive ground-based fibre networks in remote areas.
How LEO Satellites Differ from Traditional Geostationary Systems
To truly appreciate starlink internet for rural areas, you have to look at the physics of space.
Traditional satellite providers use geostationary (GEO) satellites. These are massive spacecraft positioned at an altitude of approximately 35,000 kilometres. Because they orbit at the exact speed of the Earth's rotation, they stay fixed over one spot. However, the sheer distance that your internet signal has to travel — from your home, up 35,000 km into space, down to a ground station, and then all the way back — creates a massive delay. This delay is known as latency.
GEO satellite connections usually suffer from latency of 600 milliseconds or more. That split-second delay makes real-time applications almost impossible to use.
Starlink satellites orbit in Low Earth Orbit (LEO) at around 550 kilometres above the Earth. Because they are roughly 60 times closer to the ground than traditional satellites, the signal travel time is drastically reduced. This brings latency down to a crisp 20 to 50 milliseconds.
For a comprehensive look at how this impacts everyday household use, check out our guide on Satellite Internet for Rural Homes. This low latency is what finally allows rural families to enjoy:
- Lag-free online gaming with friends
- Smooth, high-definition video conferencing for school or remote work
- Instant loading of cloud-based business applications and streaming services
Why Starlink Internet for Rural Areas Beats Traditional Broadband
When living in regional or remote areas, your internet options are usually limited. Standard fixed-line connections like fibre-to-the-premises are rarely built out to remote acreage. That leaves most rural residents choosing between copper-based lines, mobile networks, fixed wireless, or satellite.
When we compare these technologies, Starlink consistently comes out on top for speed and capacity. While regional mobile networks and fixed wireless can get congested during peak evening hours when everyone logs on to stream movies, Starlink's massive constellation provides a highly resilient and distributed network capacity.
In terms of raw performance, Starlink regularly delivers download speeds between 65 Mbps and 220 Mbps, with upload speeds sitting comfortably between 8 Mbps and 20 Mbps. Compare this to standard regional connections that often struggle to hit 25 Mbps on a good day. For an in-depth comparison of how these services stack up in regional areas, see our analysis of Starlink vs NBN.
Additionally, Starlink boasts an average uptime of greater than 99.9%. Because the system does not rely on local telephone poles or physical copper lines running through the bush, it is immune to the common regional headaches of fallen trees, vehicle accidents taking out roadside pillars, or water getting into old copper pits.
Is Starlink Internet for Rural Areas Worth the Cost?
While Starlink offers incredible performance, it does require a larger upfront investment than traditional plug-and-play regional plans. You must purchase the hardware kit outright, which includes the dish, a router, and the necessary cabling.
On top of the hardware, there is a flat monthly subscription fee. Unlike some traditional satellite plans that throttle your speeds to a crawl after you use a small amount of data, Starlink’s standard residential plans offer unlimited data. This means you do not have to constantly monitor your family's data usage or worry about extra charges for streaming movies in high definition.
For those running commercial operations or high-demand home businesses, Starlink also offers priority data tiers. These tiers guarantee faster speeds and prioritised bandwidth during peak times, which can be an absolute lifesaver for businesses that cannot afford a second of downtime.
When you look at the long-term value, as detailed in the Starlink Rural Home Review 2026, the investment is highly cost-effective for properties that previously had no way to access modern digital services. It unlocks the ability to work from home, run a business, and access online education without compromise.
Real-World Deployments in Healthcare, Education, and Business
The impact of starlink internet for rural areas goes far beyond streaming movies. It is actively transforming communities across the globe by bringing vital services to places that were once completely isolated.
In healthcare, Starlink is a major catalyst for regional telemedicine. For instance, the massive Murang'a County Starlink deployment connected 170 public health facilities in rural Kenya. This initiative allowed remote clinics to instantly transmit lab results, access digital patient records, and conduct real-time video consultations with specialists in major hospitals, saving countless lives and cutting internet costs by up to 70% compared to terrestrial alternatives.
In education and youth development, programs like the collaboration between Tractor Supply and 4-H clubs have used Starlink to bridge the digital divide for rural youth. By deploying Starlink kits to regional clubs, they have enabled kids to participate in advanced STEM, robotics, and digital literacy programs that were previously out of reach due to poor internet coverage.
For agricultural businesses, reliable satellite internet is the foundation of modern farming. Farmers use Starlink to:
- Monitor live livestock cameras and security feeds across large acreages
- Run precision GPS and telemetry systems on tractors and harvesters
- Connect smart soil moisture sensors and automated weather stations
- Manage digital supply chains, livestock sales, and grain trading platforms in real time
Step-by-Step Guide: How to Install and Mount Your Starlink Dish
One of the best things about Starlink is that it is designed to be user-installed. You do not need to wait weeks for a technician to drive out to your property. However, a successful installation requires a bit of planning to ensure your dish has a completely clear view of the sky.

Here is our step-by-step DIY installation walkthrough:
- Scan for Obstructions: Before you mount anything, download the official Starlink app on your smartphone. Use the built-in AR obstruction tool to scan the sky from your proposed installation location. You want to aim for 0% obstructions. Even a single tree branch blocking a tiny sliver of the sky can cause annoying dropouts every time a satellite passes behind it.
- Unbox the Kit: Carefully unbox your kit. It contains your Starlink dish, the router, a power cable, and the main connection cable. Handle the main cable with care — avoid sharp bends and protect the proprietary connectors from dirt and moisture.
- Assemble the Mount: Assemble your chosen permanent mount. While the kit comes with a temporary kickstand, this is not suitable for permanent installation on Australian roofs.
- Secure the Dish: Click the Starlink dish shaft into your mount until it locks securely into place. Route the cable through the mount, ensuring you leave a small drip loop so rainwater runs off the cable rather than into the connection point.
- Route the Cable Indoors: Run the cable into your home. Ensure you maintain a minimum bend radius of at least 2.5 cm to avoid damaging the internal copper wires. Use UV-resistant cable clips every 45 to 60 cm to keep the cable secure against the wind.
- Plug in and Boot Up: Connect the cable to your Starlink router and plug it into a power source. The dish will automatically power up, tilt, and begin scanning the sky to align itself with the satellite constellation.
- Configure Your Network: Open the Starlink app to set up your custom Wi-Fi network name and password. If you prefer to use your own high-end mesh router system, you can easily enable "Bypass Mode" within the app settings.
Choosing the Best Dish Mounts for Starlink Internet for Rural Areas
We cannot emphasise this enough: your Starlink performance is only as good as your physical installation. The temporary kickstand included in the box is designed for ground testing, not for surviving a severe storm on a tin roof.
When choosing a permanent mounting solution, you need to assess your property's layout:
- Roof Mounts: Ideal for standard metal or tile roofs where you have a clear, elevated view of the horizon.
- Wall Mounts: Great for properties with high eaves where you can mount directly to the timber or brickwork to clear the roofline.
- Pole Mounts: Necessary if you are surrounded by tall timber or live in a valley. Elevating the dish on a heavy-duty pole can help you clear the tree canopy and eliminate obstructions.
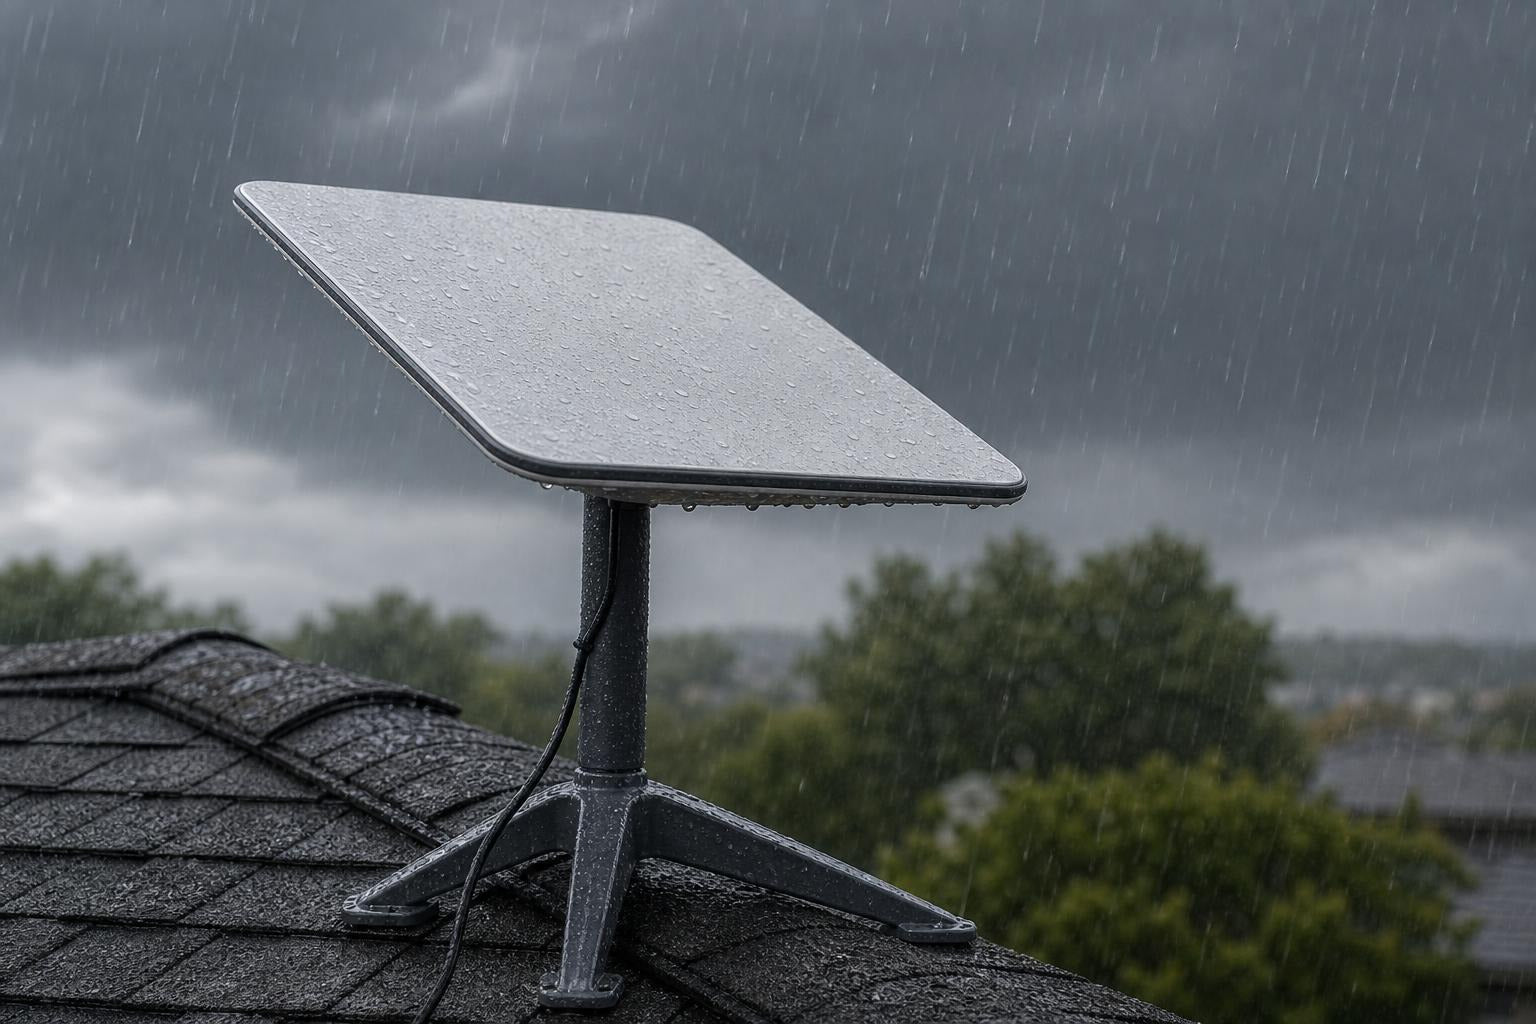
To ensure your dish stays online during extreme weather, always choose heavy-duty, precision-machined aluminium or reinforced composite mounts. At SpaceTek Australia, we design and manufacture premium, rust-resistant House Starlink Mounts Accessories specifically tailored to withstand harsh Australian conditions. Our mounts are engineered to handle winds exceeding 160 km/h, ensuring your dish remains perfectly stable and pointed exactly where it needs to be.
Real-World Performance: Weather, Obstructions, and Off-Grid Power
A common concern for rural users is how satellite technology handles extreme weather. Because Starlink operates in the high-frequency Ka and Ku bands, very heavy rain can cause minor signal attenuation, commonly known as "rain fade." However, because Starlink's satellites are constantly moving and the dish can communicate with multiple satellites at different angles, total outages are incredibly rare and usually last less than a few minutes during severe downpours.
For those in colder regions, the dish has a built-in automatic heating element designed to melt snow and ice accumulation, preventing signal blockage. In hot climates, the hardware is rated to operate in temperatures up to 43°C (110°F).
The biggest threat to your real-world performance is not the weather — it is physical obstructions. If your dish's field of view has more than a 5% obstruction rate from trees or buildings, you will experience frequent, brief disconnections. This is why getting your dish elevated using a proper mount is so critical.

Going Off-Grid with StarPower DC Power Supplies
For off-grid homes, remote outposts, and caravan travellers, power consumption is just as important as internet speed. Running a standard Starlink setup off-grid usually requires running a 240V AC inverter 24 hours a day. This is highly inefficient, as inverters waste a significant amount of battery energy just converting DC battery power to AC power, only for the Starlink power brick to convert it right back to DC.
To solve this, we developed the StarPower V2 and V3 DC power supplies. These smart, highly efficient DC-to-DC power solutions allow you to run your Starlink system directly from your 12V or 24V house battery or dual-battery setup, offering substantial DC-to-DC efficiency advantages over traditional AC inverters.
By bypassing the standard AC inverter, you can:
- Significantly reduce your overall system power draw by eliminating unnecessary conversion losses
- Eliminate inverter hum and standby power losses
- Run your system directly alongside our compact Starlink Mini portable gear for the ultimate lightweight, off-grid setup
- Create a clean, reliable, low-voltage internet system that keeps you connected even when your main solar system is running low on winter days
Frequently Asked Questions
Can I use Starlink if my property has heavy tree coverage?
Yes, but you will need to plan your installation carefully. Trees are the number one cause of Starlink dropouts. Before ordering, use the obstruction scanner in the Starlink app. If your home is surrounded by tall timber, you cannot simply place the dish on a standard roof mount.
To get a clear connection, you will need to elevate the dish above the tree line. This is usually done by installing a tall, heavy-duty pole mount secured to your roof or cemented into the ground, or by clearing a few key branches that fall directly within the dish's 110-degree sky-view cone.
How does extreme Australian weather affect Starlink performance?
Starlink is built to be incredibly tough. The dish and cabling are fully weather-resistant and designed to handle intense UV exposure, outback dust, and heavy downpours. While extreme rain can occasionally cause brief speed drops, the system’s high-power phased-array transmitters quickly adapt to maintain a stable link.
To ensure your system survives severe storms, it is vital to use high-quality, wind-resistant aluminium Starlink mounts rather than cheap, flimsy alternatives. Properly securing your cables with UV-rated clips also prevents the wind from whipping the cable against your roof, which can cause internal wire fractures over time.
What are the advantages of running Starlink on DC power?
Running your Starlink on direct DC power using a StarPower DC power supply is a complete game-changer for off-grid properties and 4WD setups. Standard 240V AC setups require your inverter to be running constantly, which wastes precious battery capacity through heat loss.
By switching to a dedicated DC-to-DC setup, you dramatically lower your daily amp-hour consumption, allowing your battery bank to last significantly longer. It also allows you to bypass the standard Starlink router completely, making it incredibly easy to integrate the dish directly into your own custom 12V marine, caravan, or off-grid home network.
Conclusion
Finding reliable starlink internet for rural areas no longer means settling for second-rate speeds or dealing with constant dropouts. Starlink has successfully bridged the digital divide, allowing regional families, farmers, and remote workers to access the same high-speed, low-latency internet enjoyed by city dwellers.
However, to get the absolute most out of your Starlink investment in the unforgiving Australian environment, you need a setup that is built to last. From securing your dish against howling winds with our precision-engineered, heavy-duty aluminium dish mounts, to maximising your off-grid battery life with our efficient StarPower DC power supplies, we have everything you need to get connected the right way.
Ready to take your rural internet setup to the next level? Explore our range of custom mounting solutions and off-grid power gear, or reach out to us at SpaceTek Australia for expert advice on customising your setup.
Leave a comment
This site is protected by hCaptcha and the hCaptcha Privacy Policy and Terms of Service apply.