Why You Need to Connect Mesh to Starlink
Connect mesh to Starlink to extend your WiFi coverage throughout your home. Here's the quick answer:
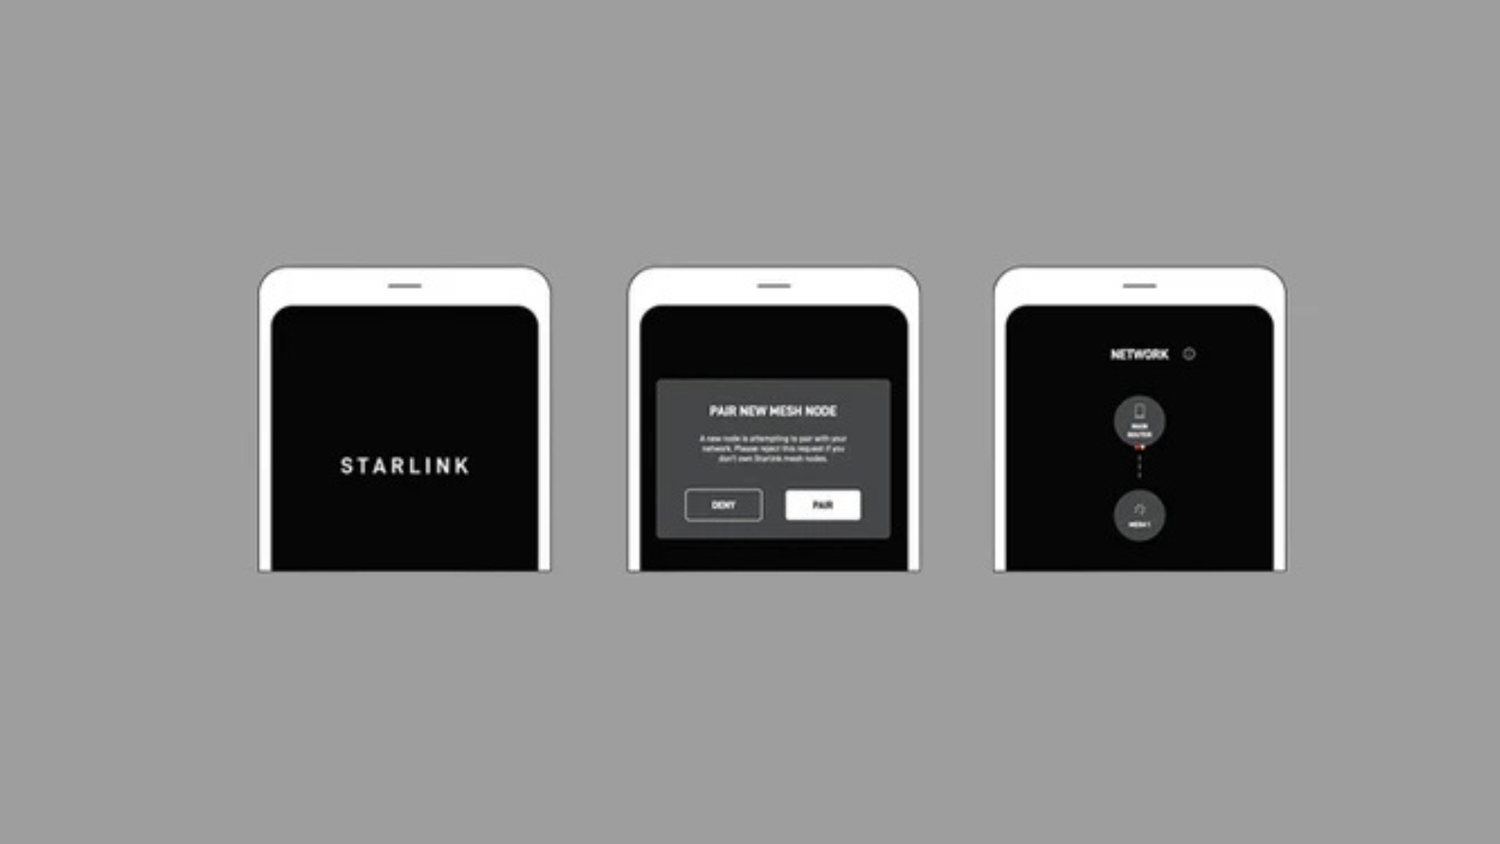
For Official Starlink Mesh Nodes:
- Ensure your Starlink Kit is online
- Plug mesh nodes into power outlets (1-2 rooms apart)
- Open the Starlink App
- Wait for "Pair New Mesh Node" notification (1-2 minutes)
- Tap "Pair" or "Pair All"
For Third-Party Mesh Systems:
- Purchase a Starlink Ethernet Adapter (Gen 2 only)
- Connect your mesh router to the Starlink router
- Enable Bypass Mode in the Starlink App
- Set up your third-party mesh system as normal
Key Limitations:
- Keep nodes 1-2 rooms apart maximum
- Avoid using more than 3 mesh nodes
- All nodes should connect directly to the main router (no chaining)
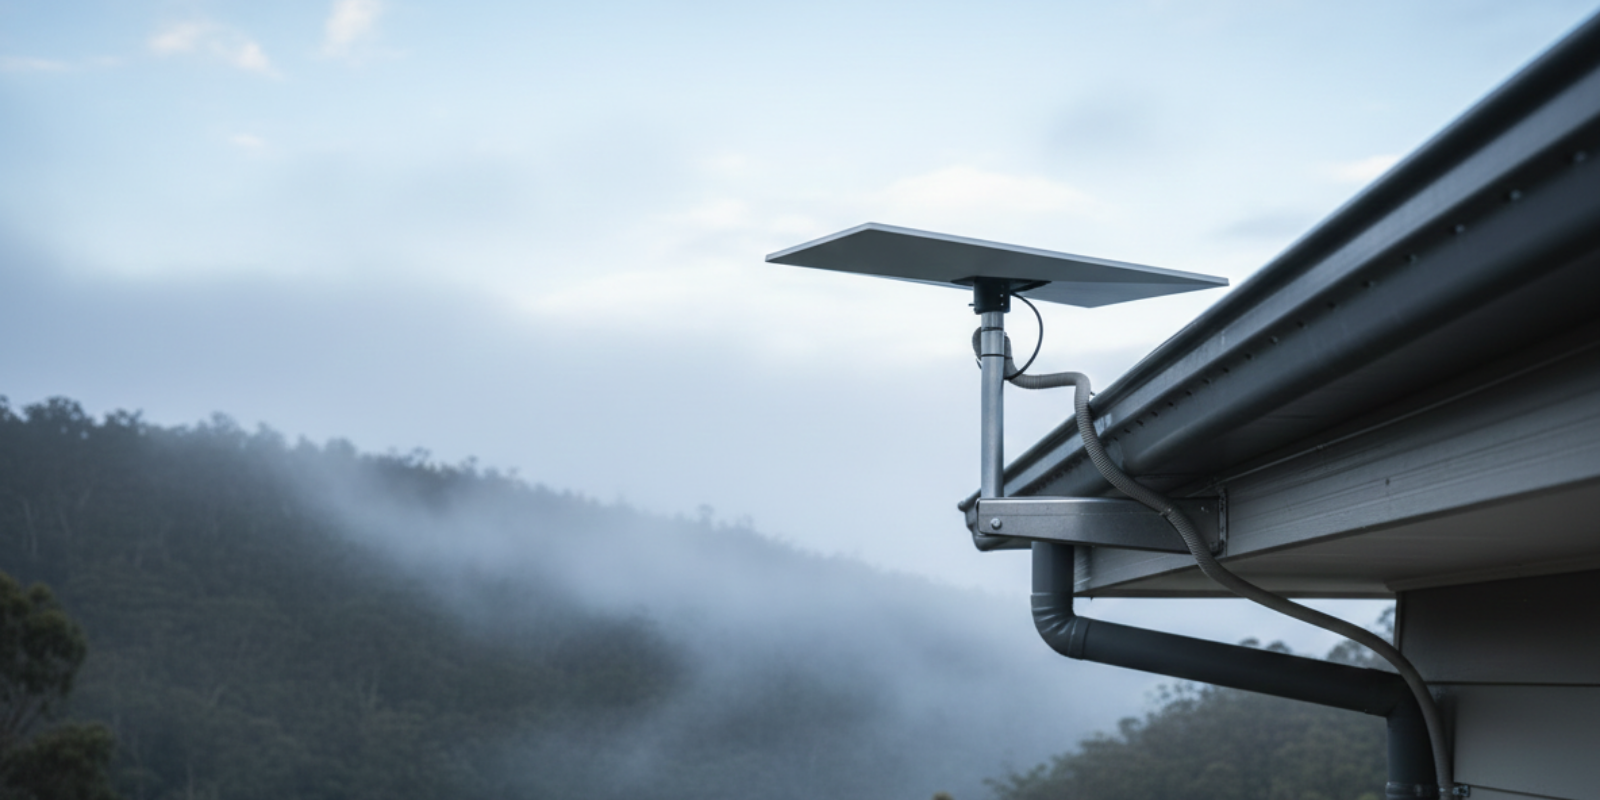
Rural and remote Australians know the frustration of weak WiFi signals. Your Starlink dish might deliver blazing-fast satellite internet to your router, but that signal often struggles to reach every corner of your home. Dead zones in bedrooms, patchy connectivity in the shed, and constant buffering in the back rooms become daily annoyances.
A mesh network solves this problem by creating a blanket of reliable WiFi coverage. Instead of a single router working overtime, multiple nodes work together to keep you connected wherever you are on your property.
I'm Aaron Wroblewski, and over 25 years working with remote communications and satellite systems, I've helped countless Australians connect mesh to Starlink for whole-home coverage. At SpaceTek, we've seen how proper mesh setup transforms connectivity in challenging rural environments where every room matters.
Getting Started: Prepping for a Seamless Mesh Network
Before you connect mesh to Starlink, a little preparation ensures a smooth setup. The key is understanding your hardware and having everything ready.
Understanding Your Starlink Hardware
Your Starlink generation determines how you'll connect a mesh system, particularly a third-party one.
- Gen 1 (Circular Dish): The router has a built-in Ethernet port for third-party systems. Official Starlink mesh nodes are not compatible.
- Gen 2 (Rectangular Dish): This is the most common model. The router has no Ethernet port, so you must purchase a Starlink Ethernet Adapter to connect a third-party mesh system. Official Starlink mesh nodes work wirelessly without an adapter.
- Gen 3 Router & Starlink Mini: These newer systems include built-in Ethernet ports, simplifying connections for third-party or wired mesh setups.
SpaceTek offers a range of accessories for all models, including Starlink Mini accessories, Gen 2 accessories, and Gen 3 mounts and accessories.
Prerequisites Checklist
Before you begin, ensure you have the following:
- A fully operational Starlink Kit with an active internet connection.
- The latest version of the Starlink App installed on your mobile device.
- Your main Starlink router powered on and broadcasting WiFi.
- Your mesh nodes and available power outlets in their planned locations.
- For Gen 2 users with a third-party system: A Starlink Ethernet Adapter (purchased from Starlink).
- For wired setups: Ethernet cables of the required length.
How to Connect Mesh to Starlink: Your Step-by-Step Guide
With your hardware ready, it's time to set up your mesh network. The process varies slightly depending on your system.
How to Connect Mesh to Starlink Using Official Nodes
Starlink's official nodes are designed for a simple, plug-and-play experience.
Wireless Setup (Easiest Method)
- Ensure your main Starlink router is online and working.
- Plug your Starlink mesh node into a power outlet one to two rooms away from the main router.
- Open the Starlink app on your phone (while connected to your Starlink WiFi).
- Within two minutes, a "New Mesh Node(s)" notification should appear. Tap "Pair" or "Pair All".
- The node will configure itself. Repeat for any additional nodes.
For more details, see Starlink's official Mesh Set Up Guide (PDF).
Wired Setup (Ethernet Backhaul for Gen 3)
For maximum performance with a Gen 3 router, a wired connection is best. Connect an Ethernet cable from a port on your main Gen 3 router to a port on your second Gen 3 router (acting as a node). The Starlink app will automatically detect the wired connection and configure it as a mesh node.
How to Connect Mesh to Starlink with a Third-Party System
Using your own mesh system requires a physical connection and a specific setting.
-
Connect the Hardware:
- Gen 2 Users: You must use the Starlink Ethernet Adapter. Plug it into your Starlink router, then connect an Ethernet cable from the adapter to your third-party mesh router's WAN/Internet port.
- Gen 1/Gen 3 Users: Connect an Ethernet cable directly from your Starlink router's Ethernet port to your mesh router's WAN/Internet port.
Enable Bypass Mode: In the Starlink app, go to Settings > Advanced and enable Bypass Mode. This turns off the Starlink router's WiFi and routing functions, letting your third-party system manage your entire network. This is the recommended approach as it prevents network conflicts like "Double NAT". Note: To undo this, you'll need to factory reset the Starlink router. Learn more about Bypass Mode explained on Starlink's site.
Set Up Your Mesh: Follow the manufacturer's instructions for your third-party system. If you choose not to use Bypass Mode, configure your mesh system in "Access Point (AP) Mode" to avoid network issues.
For system ideas, see our guide on The best mesh systems for Starlink users.
Best Practices for Node Placement and Performance
Where you place your nodes is critical for performance. Poor placement will lead to slow speeds and dropouts, regardless of how good your system is.
- Stay Close: Place nodes a maximum of one to two rooms apart. Use the Starlink app's WiFi scanner to find locations with a strong existing signal.
- Centralise Your Router: Position your main Starlink router as centrally as possible in your home.
- Avoid Chaining: Ensure all mesh nodes connect directly back to the main router, not to each other in a series. Chaining significantly degrades performance.
- Less is More: Using more than three mesh nodes can create interference and slow your network. Focus on strategic placement of a few nodes.
- Minimise Obstructions: Keep nodes in open spaces, away from thick walls (brick, concrete), large metal objects, and appliances like microwaves. An liftd position on a shelf is better than on the floor.
For more tips, read Starlink's guide on How to improve your WiFi connectivity or our advanced guide to Extend Your Starlink Range.
Troubleshooting and Final Touches
Even with a perfect setup, you might encounter issues. Here’s how to solve the most common problems.
Solving Common Mesh Connection Problems
- Node Won't Pair: Move the node closer to the main router. Ensure your phone is connected to your primary Starlink WiFi network, not the temporary one broadcast by the new node. Also, confirm you're using a Gen 2/3 router, as official mesh nodes are not compatible with Gen 1.
- Weak Connection or Slow Speeds: This is almost always a placement issue. Nodes are too far apart, or something is causing interference. Use the Starlink app's WiFi scanner to find a better location with a stronger signal. Remember to avoid chaining nodes; each should connect directly to the main router.
- App Acting Up: Restart the app completely. If that fails, clear the app's cache in your phone's settings and ensure you're connected to the correct WiFi network.
- The Factory Reset Fix: If a node is unresponsive, a factory reset can help. Quickly power cycle it 3 times (plug in, wait for light, unplug, repeat). This will restore it to its original state, allowing you to attempt pairing again.
For more tips, see our guide on Boosting Starlink WiFi.
Conclusion: Achieving Whole-Home Coverage
Learning how to connect mesh to Starlink is the best way to achieve seamless WiFi coverage. Whether using official or third-party nodes, success lies in strategic placement: keep nodes 1-2 rooms apart and avoid chaining them.
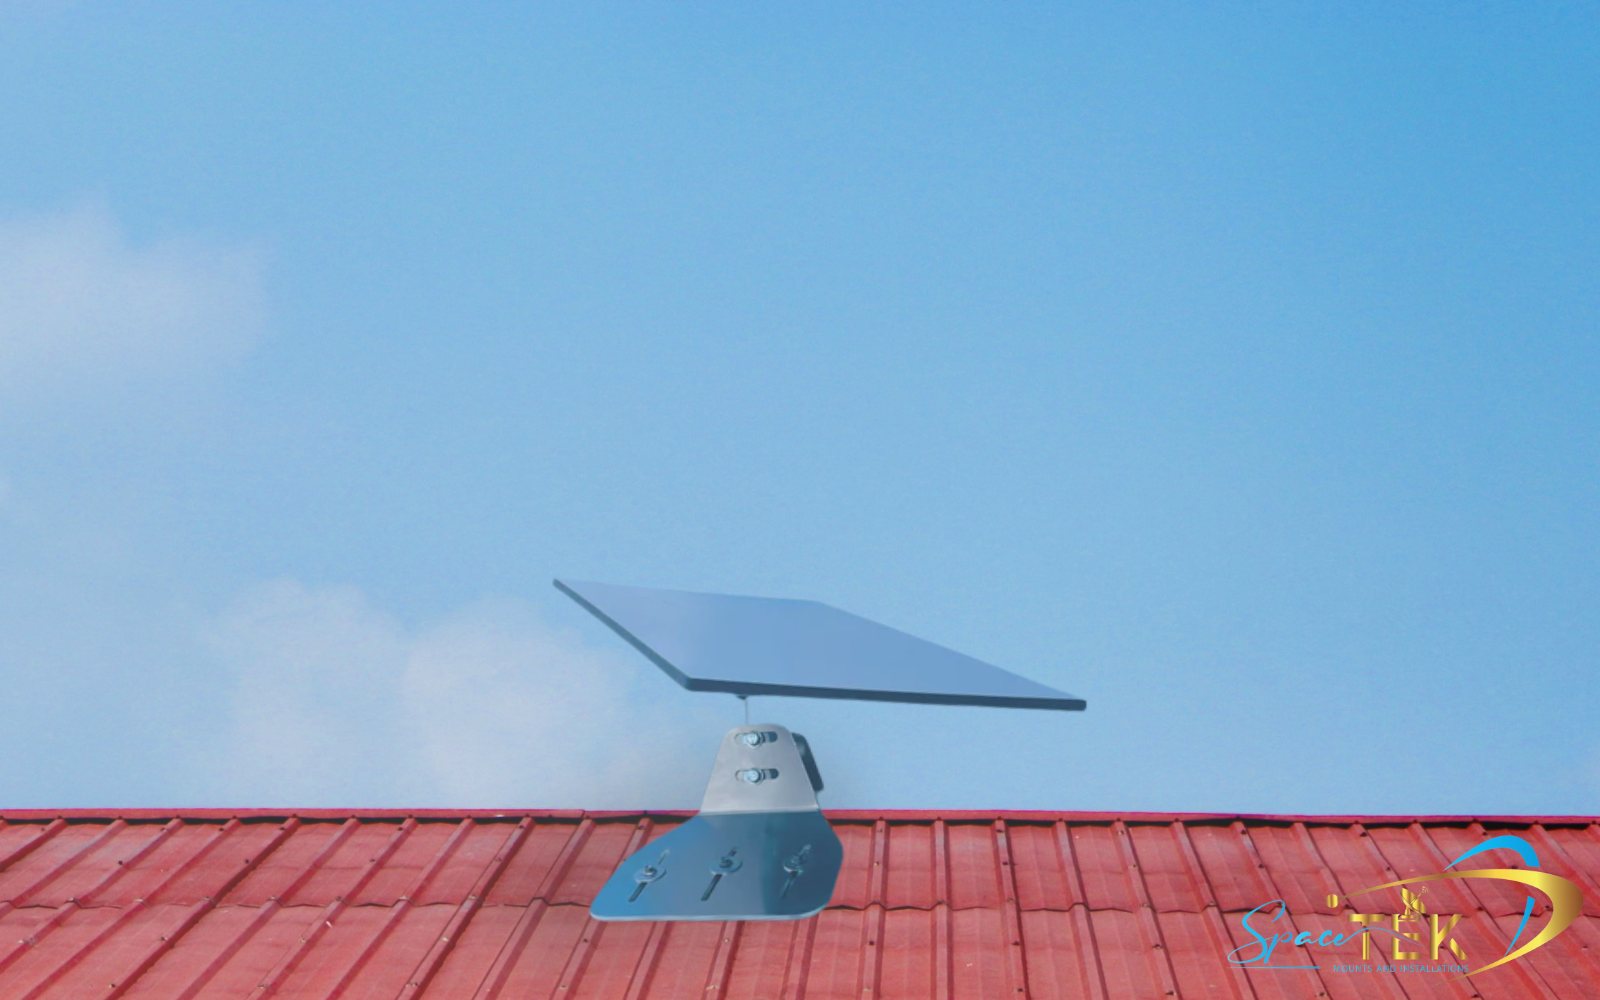
However, your mesh network is only as good as the signal it receives. An unstable or poorly positioned Starlink dish will undermine your entire setup, causing speed and reliability issues that no mesh system can fix.
At SpaceTek Australia, we specialise in high-quality, rust-resistant mounts engineered for Australian conditions. Our mounts ensure your dish remains stable and secure, providing the solid foundation your mesh network needs to deliver flawless performance. From roofs to caravans, our mounts are designed for easy self-installation and long-term durability.
Ready to optimise your entire Starlink system? Get in touch with our experts for advice on the best mounting solution for your property.

Leave a comment
This site is protected by hCaptcha and the hCaptcha Privacy Policy and Terms of Service apply.