
Why Every Van Needs a Dedicated Starlink Mount

A Starlink mount for van installations is essential for keeping your satellite dish secure, performing optimally, and withstanding Australian road conditions. Without one, you risk damaging expensive equipment and suffering from poor signal quality every time you hit a rough patch.
The freedom of van life shouldn't mean sacrificing reliable internet. A proper mount transforms your Starlink from a fragile piece of tech into a dependable travel companion, ensuring a clear line-of-sight to satellites and protecting your investment. Key solutions range from permanent bolt-on systems to temporary magnetic mounts, with specialised options for in-motion connectivity.
I'm Aaron Wroblewski, founder of SpaceTek Australia. With over 25 years in satellite communications, I design mounting systems specifically to handle our harsh sun, coastal air, and corrugated roads—challenges that cause many imported solutions to fail.
Getting Started: Why a Proper Mount is Non-Negotiable
For van life, reliable internet is a necessity for remote work, navigation, and staying in touch. Starlink offers incredible high-speed connectivity, but to open up its full potential in a mobile environment, a dedicated Starlink mount for van use is non-negotiable.
Here are the primary benefits:
Performance and Stability: A secure mount keeps your dish stable on bumpy roads and in high winds, preventing signal drops and interruptions. It also allows you to position the dish for an optimal, unobstructed view of the sky—usually on the roof—which is critical for maintaining a strong connection.
Equipment Protection and Security: The Australian environment is tough. A robust mount made from quality materials protects your Starlink dish from vibrations, impacts, and harsh weather. The Gen 3 dish, for example, has vulnerable edges that a mount safeguards. Furthermore, a fixed mount deters theft, securing your investment when you're parked in remote areas.
Convenience: A permanent mount eliminates the daily hassle of setting up and packing down your dish. Your internet is ready the moment you park, with cables neatly integrated into your van for a clean, professional look.
How to Choose and Install the Best Starlink Mount for Your Van
This section will guide you through selecting and installing the perfect mount for your mobile adventures.
Exploring Mount Types: Permanent, Temporary, and In-Motion
Choosing the right Starlink mount for van life depends on your travel style. We offer a range of solutions to suit every need:
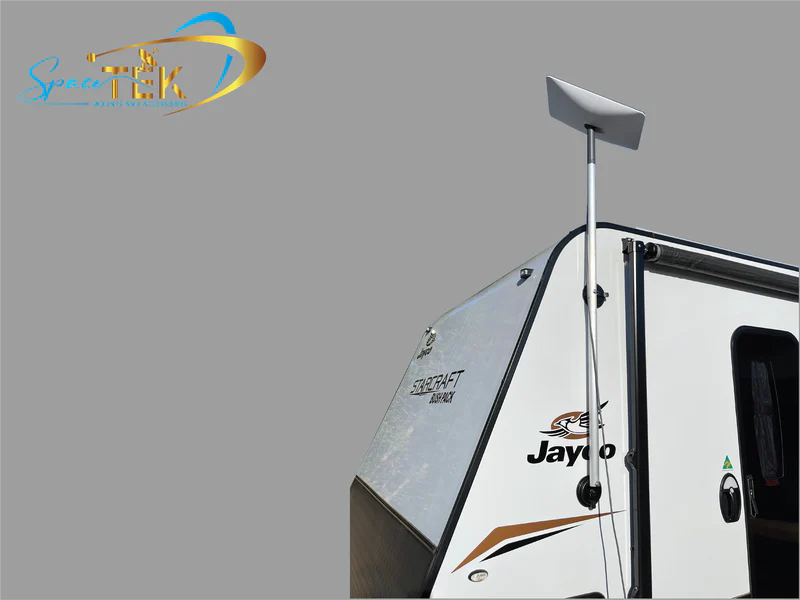
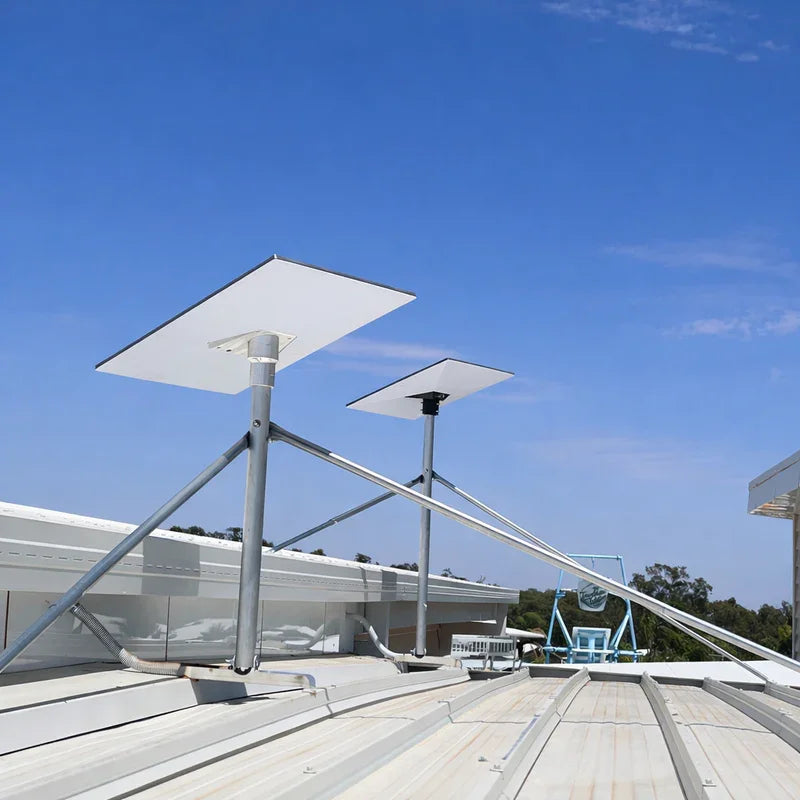
- Fixed Mounts (Permanent): These offer the best security and stability, ideal for those who want a permanent, set-and-forget solution. They include bolt-on options and roof rack mounts that clamp onto existing bars. They are the best choice for enabling in-motion use.
- Temporary Mounts: Perfect for those who don't want to drill into their van. Options include magnetic, suction cup, and pole mounts. They offer flexibility and quick setup but are generally recommended for stationary use only. For more details, see our Practical Guide to Choosing the Best Starlink RV Suction Cap Mount.
- Specialised Mounts: These include drawbar and toolbox mounts, which provide a secure fixing point without penetrating the roof.
- In-Motion Mounts: For connectivity while driving, these heavy-duty fixed mounts are engineered to resist vibration and maintain a signal at speed. Learn more in our Guide to Starlink Mini In-Motion Mount and Accessories.
Essential Features for Your Van's Starlink Mount
When selecting a mount, prioritise these features:
- Durable Materials: Look for high-grade aluminium and stainless steel to resist rust and corrosion from coastal air and rough roads.
- Weather Resistance: The mount must withstand Australia's harsh sun, rain, and dust.
- Compatibility: Ensure the mount is designed for your specific Starlink dish (Gen 2, Gen 3, or Mini).
- Security: Look for tamper-proof designs or compatibility with security tethers to deter theft.
- Aerodynamics: A sleek design minimises wind resistance and impact on fuel efficiency.
For a deeper dive, read our guide on Starlink RV Mounts: What to Consider.
Matching the Mount to Your Dish: Gen 2, Gen 3 & Mini Solutions
It's crucial to match the mount to your dish generation for a secure fit.
- Starlink Gen 2 (Rectangular): Often requires one of our custom adapters to connect the dish's mast to a pole or roof mount.
- Starlink Gen 3 (Standard): This flatter dish needs a specific cradle-style mount that it can 'drop into', which we provide. A SpaceTek pipe adapter may also be needed for pole mounting.
- Starlink Mini: This compact dish is lighter and works well with smaller magnetic or suction mounts, but still needs a dedicated solution for security on a van. Explore options in our Starlink Mini Mounting Options: A Complete Guide.
DIY Installation Tips for Your Starlink Mount for Van Setups
Installing a Starlink mount for van can be a straightforward DIY project.
- Find the Best Spot: Use the Starlink app to find a location on your roof with a clear, unobstructed view of the sky.
- Plan Cable Routing: Run the cable from the dish to your van's interior using a weatherproof entry point to prevent leaks and protect the cable from damage.
- Drill or No-Drill: If drilling, ensure you are fixing to a structural point and seal all holes with marine-grade sealant. No-drill options like roof rack clamps are easier but must be securely fastened.
- Check Structural Integrity: Make sure the mounting area can handle the weight and wind load.
For more tips, check out Starlink on the Road: Accessories, Mounts, and Expert Tips.
Powering Your Setup: 12V Conversions and Off-Grid Energy
For efficient off-grid power, a 12V DC power conversion is essential. Running Starlink through a standard inverter wastes significant energy. A dedicated DC power supply connects Starlink directly to your van's 12V system, cutting power consumption by up to 30-50%. This is a game-changer for extending battery life when relying on solar power. Many of our mounts are designed to integrate seamlessly with these 12V conversion kits. Find out more about essential Starlink Accessories for Your Caravan.
Final Checks and Getting Expert Advice

Choosing and installing the right Starlink mount for van travel is a crucial step for any connected adventurer in Australia. A dedicated mount provides stability, protects your equipment, and optimises signal performance, giving you a seamless internet experience wherever you roam.
Remember to match the mount to your dish generation and consider a 12V power conversion for ultimate off-grid efficiency.
At SpaceTek Australia, we provide custom Starlink mounting kits designed for the unique demands of Australian conditions. Our high-quality, rust-resistant, and user-friendly mounts ensure your dish performs securely and optimally on any journey.
Ready to dish up adventure with confidence? For personalised advice on your van setup and to explore our range of mounts built for Australian conditions, please contact us for personalised advice on your van setup. Our team is here to help you stay connected, no matter how far off the beaten track you go.
Leave a comment
This site is protected by hCaptcha and the hCaptcha Privacy Policy and Terms of Service apply.