Why a Starlink Roof Pole Mount Makes All the Difference

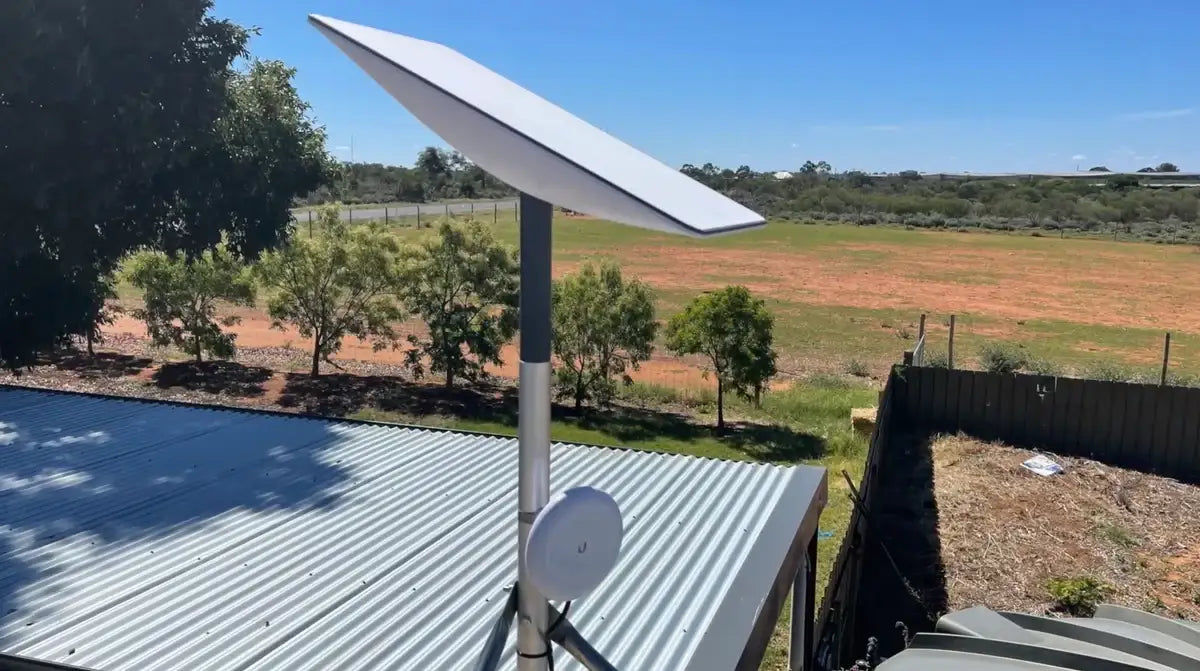
A Starlink roof pole mount elevates your dish above rooflines, trees, and other obstructions for a clearer, more stable satellite signal.
Here's what a roof pole mount gives you:
- Better sky view — lifts your dish above gutters, chimneys, and nearby structures
- Stronger signal — less obstruction means fewer dropouts and faster speeds
- Permanent, secure installation — built to handle wind, rain, and harsh Australian weather
- Flexible placement — compatible with tin, tile, and corrugated iron roofs
- Cleaner cable routing — keeps wiring tidy and protected from the elements
The standard kickstand that ships with your Starlink kit is designed for ground-level testing — not permanent installation. If you're in a rural or remote area with obstructions at ground level, you need elevation.
That's where a roof pole mount changes everything.
Most connection problems people blame on Starlink itself are actually caused by a poorly positioned dish. Trees, hills, rooflines — even a nearby shed — can interrupt the signal path to low-earth orbit satellites as they move overhead.
Getting your dish up on a pole, mounted securely to the roof, solves the majority of these issues in one go.
Starlink roof pole mount terms you need:
Choosing the Right Starlink Roof Pole Mount for Your Kit
Selecting the right hardware starts with knowing which Starlink kit you have. Because Starlink has evolved through several generations, the mounting points have changed. Whether you are using the older Standard Actuated "Dishy," the latest Gen 3 V4, or the ultra-portable Starlink Mini, your mounting needs will differ.

For the best results, we recommend Starlink roof mounts that use high-quality materials like aluminium or galvanised steel. In Australia, salt air and intense UV rays can quickly degrade cheap plastic or thin metal alternatives.
When comparing options, consider these SpaceTek-engineered solutions:
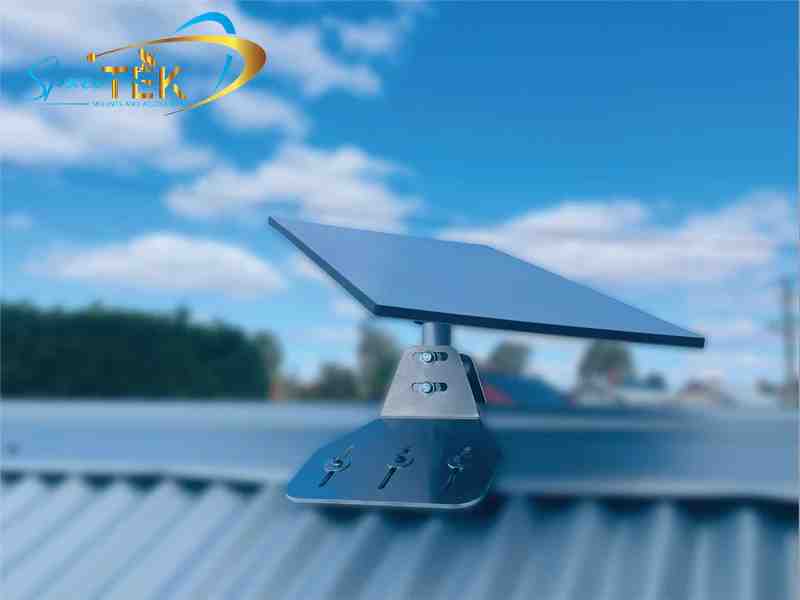
- SpaceTek Pipe Adapters: These are the "missing link" that allow a Starlink dish to sit securely on top of a standard 31mm to 50mm metal pole.
- SpaceTek Non-Penetrating Mounts: These sit across the peak of your roof and use ballast weights, meaning no drilling is required.
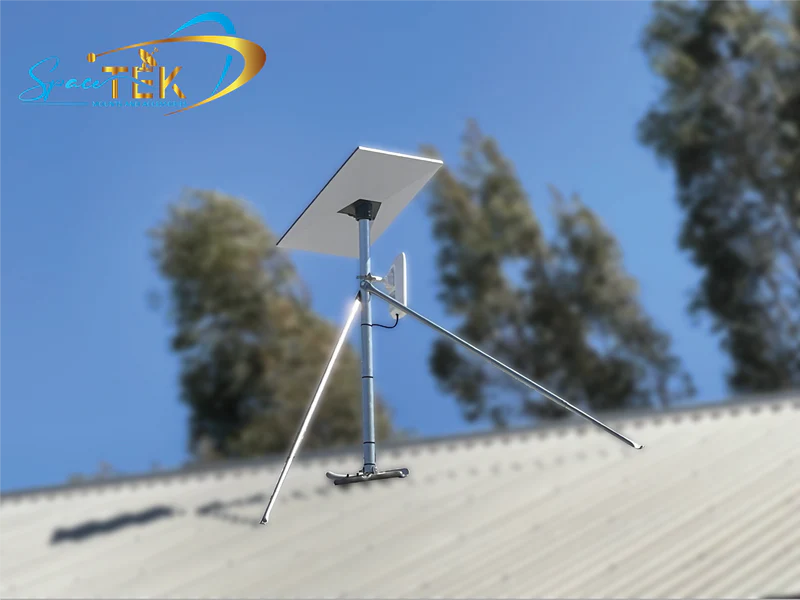
- SpaceTek Heavy Duty Pivot Mounts: These allow you to adjust the angle of the mast so your dish stays perfectly level, even on a steep pitch.
For a deeper dive into which specific kit suits your hardware, check out our guide on Gen 3 mounting kits.
SpaceTek's High-Performance Mounting Solutions
SpaceTek offers several premium mounting solutions, each designed for specific Australian scenarios.
- SpaceTek Heavy Duty Pivot Mount: This is the go-to for slanted, shingled, or tin roofs. It features a reinforced swivelling base that ensures your mast is vertical regardless of the roof's slope. For maximum water protection, it is often paired with a SpaceTek Flashing Kit.
- SpaceTek Non-Penetrating Mount: If you are renting or simply don't want to drill holes in your roof, this mount is perfect. It uses ballast weights to stay in place without compromising your roof's integrity and is engineered for stability in high-wind conditions.
- SpaceTek Precision Pipe Adapter: This is perhaps the most versatile tool. It slides over an existing metal pole (minimum 31 mm to maximum 63.5 mm diameter) and fastens with high-tensile screws. It’s the easiest way to retrofit an old antenna mast for Starlink.
Before you start drilling, ensure you have the right tools on hand and follow our detailed installation guides for a secure fit.
Mounting Solutions for Gen 3 and Mini Kits
The latest hardware, like the Gen 3 (V4) and the Starlink Mini, has moved away from the "actuated" (moving) motors. The Gen 3 dish features a kickstand that must be removed before you can attach it to a Starlink roof pole mount.
The Starlink Mini is even more flexible. We recommend using a SpaceTek Mini Pipe Adapter that fits poles between 31mm and 50mm. Because the Mini is so light, we’ve seen great success using SpaceTek aluminium masts that offer high strength without the weight of traditional steel. You can explore more options in our Starlink Mini accessories collection.
For those with the larger Gen 3 dish, a dedicated Gen 3 pole mount kit is essential to handle the increased surface area and wind load of the newer, flatter design.
Installation and Maintenance of Your Starlink Roof Pole Mount
Installing a Starlink roof pole mount is a straightforward DIY project if you have the right tools and a bit of confidence on a ladder. Safety is paramount—always use a sturdy ladder and, if possible, a safety harness when working on a roof.
Maintenance is often overlooked but vital for long-term performance. We recommend checking your mount every six months to ensure the bolts haven't loosened due to wind vibration and that the cable remains securely clipped.
Step-by-Step Guide to a Starlink Roof Pole Mount Setup
- Check for Obstructions: Open the Starlink App and use the obstruction tool. Even a tiny sliver of a tree branch can cause significant speed drops.
- Site Selection: Find a structurally sound part of the roof. For tin roofs, this means mounting into the rafters or purlins, not just the thin metal sheeting.
- Mast Alignment: Use a level to ensure your pole is perfectly vertical. If the pole is crooked, the dish’s internal GPS and sensors may struggle to align correctly.
- Secure the Mount: If using a SpaceTek pipe adapter, tighten the screws firmly. For roof racks or vehicle mounts, a torque setting of 7.5 Nm is recommended to prevent the mount from sliding.
- Cable Routing: Use cable clips every 30-50cm to prevent the wind from "whipping" the cable against your roof, which can cause the outer jacket to wear through over time.
For more detail, see our 5-step pole mount installation guide.
Roof Type Compatibility and Weather Resistance
In Australia, we deal with everything from the scorching outback heat to salty coastal gales. This is why material choice matters.
- Tin and Corrugated Iron: These are common in Australia. We recommend using stainless steel hardware and EPDM rubber washers to prevent "galvanic corrosion" (where two different metals react and cause rust).
- Tile Roofs: Be careful not to crack tiles. We often suggest a "tile bridge" or a mount that replaces a single tile to ensure a waterproof seal.
- Rust Resistance: Look for UV-stabilised plastics and powder-coated aluminium.
We’ve performed extensive field tests on tile and tin roofs to find the most durable combinations for our local climate.
Essential Accessories for Permanent Roof Installs
A mount is only half the battle. To get the internet from your roof into your living room, you’ll need a few extras:
- Ethernet Adapter: Essential if you want to bypass the Starlink router or connect to a mesh system.
- Masonry Routing Kits: If you need to feed the cable through a brick wall.
- Silicone Sealant: Never skip this! Every hole you drill needs to be filled with high-quality, UV-rated silicone to prevent leaks.
- Cable Clips and Mastic Tape: For sealing connections and keeping the run tidy.
Browse our full range of Starlink cables and accessories to complete your setup.
Expert Support with SpaceTek
Securing your Starlink with a high-quality Starlink roof pole mount is the single best thing you can do to ensure reliable, high-speed internet. By elevating the dish, you bypass the obstructions that cause 90% of connection issues.
At SpaceTek Australia, we specialise in mounts that are built specifically for the Australian environment. Our kits are rust-resistant, easy to install, and designed to provide a secure foundation for your Starlink hardware, whether you're in the suburbs or the deep outback.
If you have questions about which mount is right for your roof type or kit generation, we are here to help. Get in touch with our team for expert advice tailored to your specific location.
Leave a comment
This site is protected by hCaptcha and the hCaptcha Privacy Policy and Terms of Service apply.