
Why a Starlink Roof Peak Mount Is the Smartest Way to Clear Obstructions

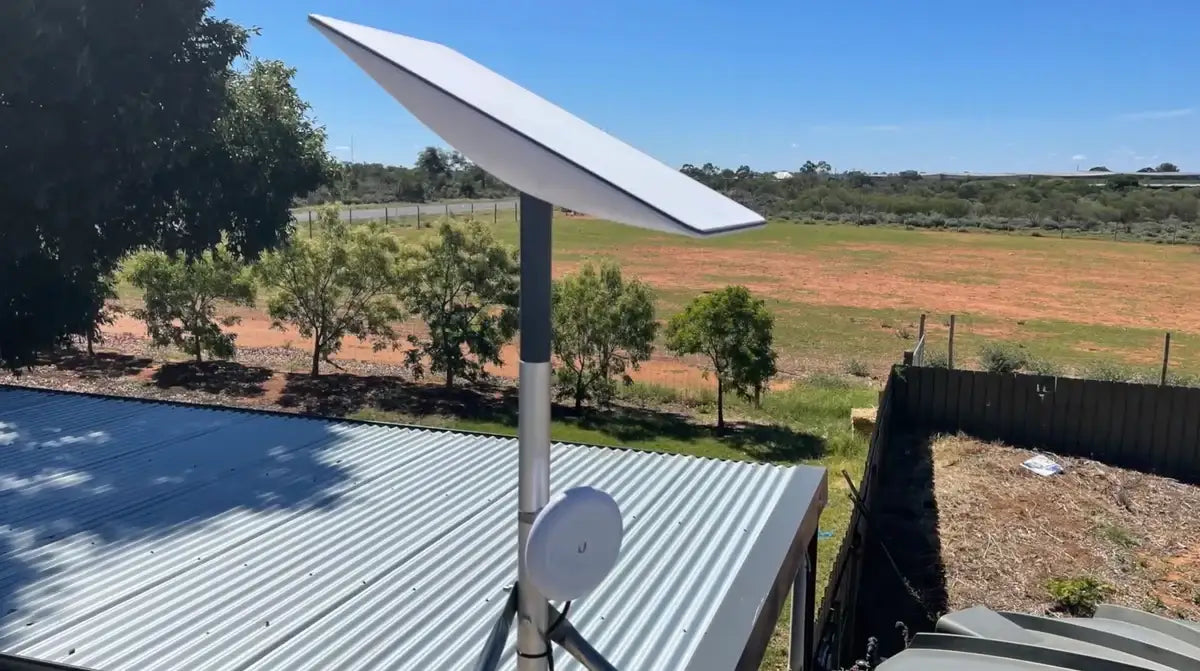
A Starlink roof peak mount positions your satellite dish at the highest point of your roof, giving it an unobstructed 360-degree view of the sky and the clearest possible connection to Starlink's low-earth orbit satellites.
Quick answer - what a Starlink roof peak mount does:
- Sits on the ridge (peak) of your roof without requiring any drilling
- Uses ballast weights to stay secure in winds up to 185 kph (115 mph) with full ballast on heavy-duty SpaceTek options
- Suits metal and shingled roofs with slopes less than 45 degrees
- Compatible with Starlink Standard (Gen 2 and Gen 3), Mini, and Performance kits (with the right adapter)
- Clears trees, walls, and rooflines that block signal at ground level
If you've already got a clear view of the sky from a lower position, a roof peak mount may not be necessary. But for most Australian homes surrounded by trees, neighbouring structures, or uneven terrain, getting your dish above the roofline makes a real difference to signal reliability.
Mounting at the roof ridge also avoids the headaches of drilling through your roof, which can cause leaks if not sealed properly. A no-drill, ballast-weighted design keeps your roof intact while still giving your dish the elevation it needs.
That said, any roof installation comes with real safety considerations. Working at height always carries risk, and a roof peak is one of the most exposed positions on a home — particularly in a lightning storm.
This guide walks you through everything: choosing the right mount for your setup, understanding what's compatible with your Starlink kit, and installing it safely and correctly for Australian conditions.
Glossary for Starlink mounts:
Choosing the Right Starlink Roof Peak Mount for Your Setup
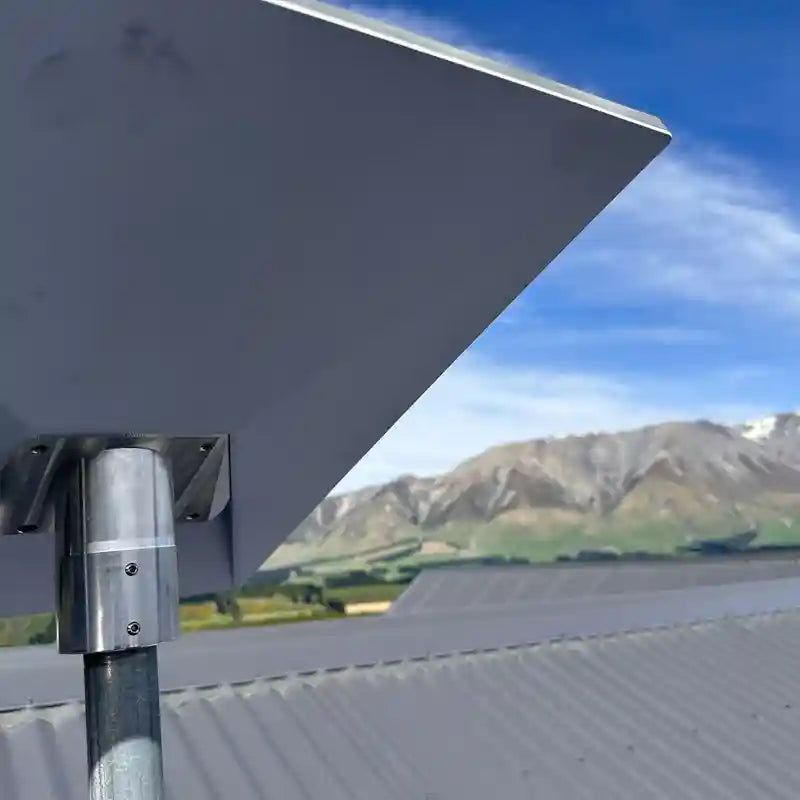
When we talk about a Starlink roof peak mount, we are usually referring to a "ridgeline" design. These mounts are engineered to straddle the apex of a gable or hipped roof. At SpaceTek, we prioritise solutions that don't compromise the structural integrity of your home.
The primary advantage of these mounts is the non-penetrating installation. Instead of driving lag bolts into your rafters, the mount uses ballast weights (usually concrete blocks) to stay in place. This is a game-changer for Australian homeowners with metal (tin) roofs or modern shingles where drilling creates a permanent leak risk.
SpaceTek ridge mounts are engineered to withstand gusts up to 185 kph (115 mph) when the ballast trays are fully loaded. This is vital for coastal or rural Australian properties prone to high winds.
Starlink Roof Peak Mount Compatibility: Gen 2 vs Gen 3
It is important to remember that Starlink mounts are kit-specific. You cannot simply swap a Gen 2 mount for a Gen 3 dish without the correct hardware.
- Gen 2 (Standard Actuated): This dish features a motor and a specific "plug-and-click" mast. The ridge mount for this version includes a socket specifically for that mast.
- Gen 3 (Standard V4): The latest version uses a kickstand and doesn't have a built-in mast. To use a ridge mount, you'll need a Gen 3 V4 adapter plate that allows the dish to click into a standard pipe or mast.
If you are upgrading from an older kit, you can often find SpaceTek adapters that allow a Gen 3 dish to sit on a Gen 2 weighted mount, ensuring you don't have to buy an entirely new ballast system.
Non-Penetrating Starlink Roof Peak Mount Solutions for Australian Homes
The secret to a secure, no-drill install is the ballast system. A typical setup includes four ballast weights, each weighing approximately 5 kg to 11 kg. When fully loaded, the mount can weigh upwards of 60 kg, providing a stable foundation that gravity keeps in place.
To protect your roof, we recommend using rubber roof pads under the mount's feet. These prevent scratching on tin roofs and stop the mount from shifting on shingles. We also suggest checking the slope of your roof; most ridge mounts are only compatible with roof pitches less than 45 degrees. If your roof is steeper, a wall or eave mount might be a better fit.
Starlink Mini and Performance Kit Mounting Options
For those using the Starlink Mini, a full-sized ridge mount might be overkill unless you specifically need height to clear a nearby tree. The Mini is lightweight and often performs well on a simple pipe adapter attached to a smaller elevated mast.
The High Performance kit, however, is a different beast. It has almost double the wind surface area of the standard dish. If you are mounting a Performance dish on a ridge, you must ensure the ballast trays are completely filled and the footprint of the mount is wide enough to prevent tipping during a storm.
Installation Guide and Performance Benefits
Installing a starlink roof peak mount is generally rated as a "medium" difficulty task. The hardest part isn't the assembly—it's safely getting the heavy ballast weights up onto your roof.
Step-by-Step Ridge Mount Setup
- Pre-Assembly: Assemble the mast and adapter plate on the ground. It’s much easier to tighten bolts while your feet are on the grass.
- Cable Routing: Thread your Starlink cable through the mast before you head up the ladder. This prevents the cable from flapping in the wind and protects the connector.
- Positioning: Carry the mount (unloaded) to the roof ridge. Deploy the legs so they sit flat against the roof surface. Ensure the centre mast is perfectly vertical using a spirit level.
- Ballast Placement: This is the "heavy lifting" phase. Carry the ballast blocks up one by one. Place them securely in the trays, ensuring the weight is distributed evenly.
- Dish Attachment: Slide your Starlink dish into the mast until it clicks. For Gen 3 dishes, you will need to use the Starlink App to manually align the dish. Since the ridge mount is fixed, you'll adjust the rotation of the dish within the pipe adapter.
For a deeper dive into general roof setups, check out our ultimate guide to installing Starlink on your roof.
Why Elevation Matters for Satellite Connectivity
There is a common myth that mounting your dish 10 feet higher will improve your "ping" or latency. In reality, an extra few metres of height only reduces latency by a fraction of a nanosecond—completely unnoticeable.
The real reason we use a Starlink roof peak mount is to clear the "Fresnel zone" and physical obstructions. A dish at ground level might lose signal every time a car drives past or a neighbour's tree sways in the wind. By elevating the dish to the ridge, you provide a 360-degree clear view, which is essential for maintaining a stable connection as satellites move overhead.
If you are still deciding between a roof or a pole, our comparison of mount types can help you weigh the pros and cons of each.
Maintenance and Weather Resistance
Australia’s climate is notoriously harsh on hardware. Between the intense UV radiation and salt spray in coastal areas, standard steel mounts can rust within a year.
At SpaceTek Australia, we customise our kits to withstand these conditions. We use high-grade aluminium and 316 stainless steel components to ensure your mount doesn't become a rusty eyesore.
Recommended Maintenance Checklist:
- Check Ballast: Once a year, ensure the concrete blocks haven't shifted or cracked.
- Inspect Cables: Look for any UV damage or fraying where the cable enters the home.
- Tighten Bolts: High winds can cause slight vibrations that loosen nuts over time.
- Clean the Dish: While the dish is self-heating to clear snow, a quick wipe to remove bird droppings or thick dust can help performance in the outback.
If you have questions about which mount suits your specific roof type, contact us for expert advice.
Quality mounts with SpaceTek
A Starlink roof peak mount is the gold standard for permanent, high-performance satellite internet installations. By choosing a non-penetrating ridgeline mount, you gain the best possible signal while protecting your home from potential water damage. Whether you are setting up a Gen 3 Standard kit or a High Performance dish, the key is using quality, rust-resistant hardware designed for the Australian environment.
Proper installation ensures your connection remains stable through summer storms and high winds. With the right ballast and a clear view of the sky, your Starlink system will deliver the speed and reliability you need, no matter how remote your location.
For more information on the best mounting hardware for your property, get in touch with the team at SpaceTek Australia today.
Leave a comment
This site is protected by hCaptcha and the hCaptcha Privacy Policy and Terms of Service apply.