Why a Starlink DC Power Supply Changes Everything
A Starlink dc power supply allows you to run your satellite internet directly from a 12V or 24V battery system. This eliminates the need for a bulky AC inverter and reduces energy waste by up to 30%.
Key Benefits of DC Power for Starlink:
- Direct Connection: Power Starlink straight from your vehicle, boat, or solar battery bank.
- Higher Efficiency: Avoid the 15-30% power loss common with AC inverters.
- Lower Startup Draw: Manage the initial power surge with proper DC conversion.
- Compact Setup: Ditch heavy AC adapters and inverters.
- Better for Off-Grid: Extend your battery life when away from mains power.
Compatible DC Power Options:
| Starlink Model | Input Voltage | Output Required | Typical Power Draw |
|---|---|---|---|
| Standard (Gen 2) | 12-48VDC | 56V 3.57A | 30-200W |
| Gen 3 | 12-48VDC | 57V 3.42A | 63W average |
| Mini | 12-48VDC | 48V 3A | 60W |
For anyone using Starlink in an RV, boat, or remote location, switching to DC power is a game-changer. As the founder of SpaceTek Australia, my 25 years in remote communications have shown that a proper Starlink dc power supply is non-negotiable for reliable off-grid connectivity.
The Freedom of Off-Grid Starlink: Why Go DC?

When you're off-grid, every amp-hour counts. The standard Starlink setup uses an AC inverter to turn your battery's 12V DC power into 240V AC, only for the Starlink power brick to convert it right back to DC. This double conversion is inefficient, wasting 15% to 30% of your precious battery power as heat.
A Starlink dc power supply eliminates this waste. By connecting directly to your battery system, power flows through a single, efficient DC-DC conversion to the exact voltage your Starlink needs. No humming inverter, no unnecessary heat, and no wasted energy.
For RVs, caravans, and boats, this efficiency means more internet runtime, less generator use, and a more compact setup without a bulky inverter. It's also perfect for backup power during outages, ensuring your solar battery system provides connectivity for longer when the grid is down.
The bottom line is simple: direct DC power gives you more internet time from your batteries. As we cover in our Powering Starlink Directly from DC: Your Ultimate Guide, it's the key to reliable, long-lasting connectivity in remote Australia.
Your Guide to the Right Starlink DC Power Supply
Choosing the right Starlink dc power supply is straightforward once you know your hardware. Each Starlink generation has unique power needs, but a direct DC solution exists for all of them.
Powering Starlink Standard (Gen 2) Systems
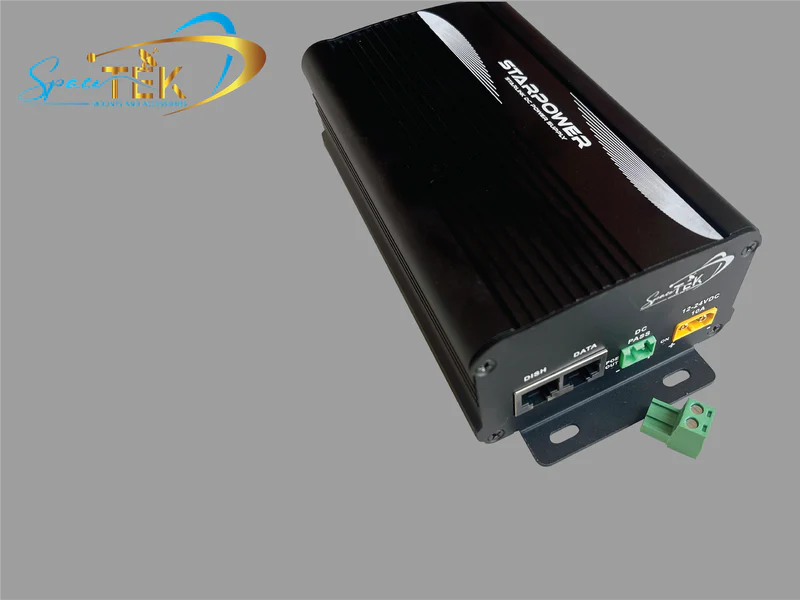
Starlink's official Standard DC-DC Power Supply is the best choice for Gen 2 systems. It efficiently converts a 12V to 48V DC input directly to the required 56V, bypassing the inverter entirely. Key features include an IP66 rating for dust and water protection, a wide operating temperature range (-40°C to 60°C), and robust XT60 connectors with heavy-duty 12AWG wire. This ensures a reliable connection, even on rough tracks.
For more details, see our guide on the Starlink Standard DC-DC Power Supply: Everything You Need to Know or the Official Starlink DC PSU Specs.
Choosing a Starlink DC Power Supply for Gen 3
Gen 3 systems require a step-up converter to boost your 12V battery power to the necessary 57V. A proper DC setup consumes around 63 watts, a significant saving over the 82 watts used with an AC inverter. Be aware of the 10 to 12 amp startup surge; your wiring and fusing must be sized to handle it. Once running, power consumption settles to normal levels.
Learn more about your options in our guide on The Easiest Way to Power Your Starlink Roam with DC Options and Starlink's official page on DC-input power supply options.
Powering the Starlink Mini
The portable Starlink Mini is the most flexible, with a 12-48VDC input and a 60W draw. To run from a standard 12V source, you'll need a step-up converter to deliver a stable 48V, preventing voltage drop issues. High-power USB-C PD car chargers are also a viable option. Dedicated 12V to 48V adapters ensure your Mini receives consistent power, maximising its portability.
Browse our Starlink Mini collection and check the official supported power sources on Starlink Mini.
Installation and Safety for Your Starlink DC Power Supply
A safe, reliable installation is critical for protecting your Starlink equipment.
- Wire Gauge: Use an appropriate wire gauge (e.g., 10AWG or 8AWG for runs over 3 metres) to prevent voltage drop.
- Fusing: Always use a dedicated circuit with a 15-20 amp fuse to protect against overloads and the initial startup surge.
- Ventilation: DC-DC converters generate heat. Mount your power supply in a location with good airflow to prevent overheating.
- Connections: Use high-quality connectors and ensure they are clean and tight to prevent resistance and power loss.
For a detailed walkthrough, read How to Understand Starlink DC Power Requirements in 3 Simple Steps and review Starlink's guide to preventing overheating.
Installation and Safety for Your Starlink DC Power Supply
Getting your Starlink dc power supply installed correctly isn't just about making it work—it's about ensuring it works safely and reliably for years to come, especially in the demanding conditions we face across Australia. A proper installation means fewer headaches down the track and more time enjoying seamless connectivity wherever your adventures take you.
The first thing to understand is that wire gauge matters tremendously. Think of your wiring as the arteries of your power system—too thin, and you'll starve your Starlink of the current it needs. The Starlink Standard DC-DC Power Supply specifies 12AWG wire for good reason. For Gen 3 setups running from 12V, we recommend nothing less than 14AWG, particularly if you're running cables over longer distances. This prevents voltage drop, which can cause your system to struggle during that critical startup phase when power demand peaks.
Speaking of startup, your Starlink can draw 10-12 amps when first booting up. This surge is why proper fusing is non-negotiable. A 15 amp fuse typically handles Gen 3 systems well, protecting your entire setup from overcurrents while still accommodating the snow melt function. It's a small component that prevents potentially expensive problems.
Here's something we see far too often: people tapping into existing circuits to power their Starlink. This can cause flickering lights, interference with other electronics, and unstable internet performance. Dedicating a circuit specifically for your Starlink dc power supply eliminates these issues entirely. Your Starlink gets clean, stable power, and your other equipment stays happy.
Heat is the silent enemy of electronics. DC-DC converters work hard, especially step-up converters that boost 12V to the 56V or 57V your Starlink needs. This work generates heat. While the Starlink Standard DC-DC Power Supply can handle temperatures from -40°C to 60°C, cooler is always better for longevity. Ensure adequate ventilation around your power supply—don't tuck it away in a sealed compartment without airflow. Mount it where air can circulate freely, and your equipment will thank you with years of reliable service.
The quality of your connections directly impacts system reliability. High-quality connectors like the XT60s used on official Starlink DC power supplies aren't just convenient—they're designed to handle high currents without developing resistance. Loose or poor-quality connections create heat, voltage drops, and intermittent power issues. Take the time to make secure, clean connections with properly terminated wiring. A bit of extra care during installation prevents countless hours of troubleshooting later.
If you're feeling uncertain about any aspect of your DC power requirements, our guide on How to Understand Starlink DC Power Requirements in 3 Simple Steps walks you through the essentials. Starlink also provides helpful information on preventing overheating that's worth reviewing before you start.
At SpaceTek Australia, we've seen every type of installation imaginable across our vast country. The setups that work flawlessly year after year are the ones where someone took the time to do it properly from the start. Quality materials, proper sizing, adequate ventilation, and secure connections—these aren't optional extras. They're the foundation of a reliable off-grid Starlink system that'll keep you connected through scorching summers, dusty outback conditions, and everything in between.
Securing Your Complete Off-Grid Setup
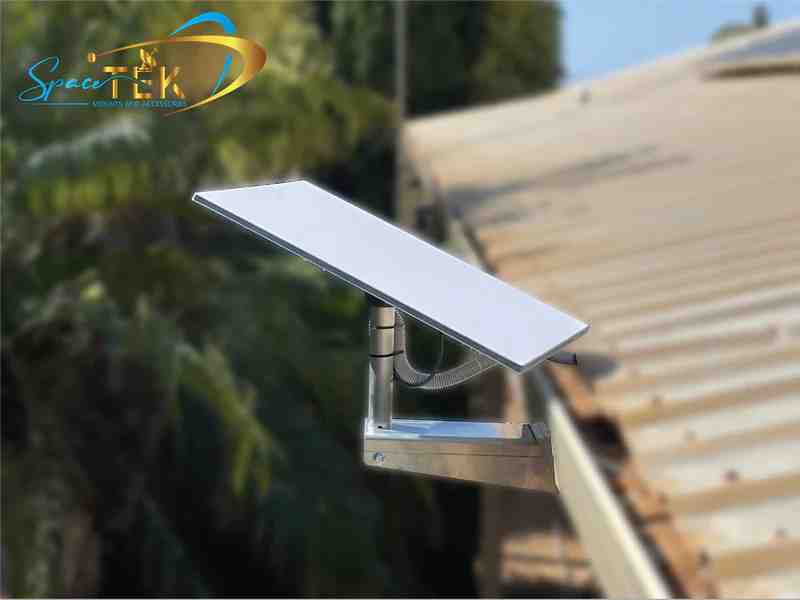
An efficient Starlink dc power supply is the first step, but a secure mount is just as critical. In the harsh Australian environment, we've seen too many dishes fail due to corrosion from salt spray or vibration on corrugated roads. A wobbly dish means an unstable connection.
That's why SpaceTek Australia designs mounting solutions specifically for our conditions. We use high-quality, rust-resistant materials like aluminium and carbon fibre to build mounts that can handle whatever the climate throws at them.
Our mounts are compatible with Starlink's self-install kits, providing a rock-solid fit that maintains a consistent connection whether you're parked or on the move. Pairing an efficient DC power system with a secure mount creates a complete, reliable setup you can trust.
For more on creating a seamless experience, see our Guide to Off-Grid Satellite Internet. To explore all your options, our Detailed Guide to Compatible Starlink Power Supplies covers everything.
If you want expert advice on the best solution for your situation, get in touch with us. We're here to help you get it right the first time.
Conclusion
Switching to a Starlink dc power supply is about gaining freedom and reliability. By eliminating the wasteful AC inverter, you get longer battery life and a simpler setup for your travels or home backup system. However, this efficiency depends on a correct installation with proper wiring, fusing, and ventilation.
Of course, a stable power supply needs a stable mount. A wobbly dish will drop its connection, no matter how good your power source is. At SpaceTek Australia, we complete the system with rust-resistant mounts made from high-quality materials like aluminium and carbon fibre. They are built to withstand harsh Australian conditions, from coastal salt to outback dust, ensuring your dish stays secure.
Our solutions integrate seamlessly with Starlink's self-installer kits, giving you professional-grade stability and peace of mind.
Ready to optimise your Starlink setup for Australian conditions? Whether you need guidance on DC power, mounting solutions, or both, we're here to help. Contact us for expert advice custom to your specific situation.

Leave a comment
This site is protected by hCaptcha and the hCaptcha Privacy Policy and Terms of Service apply.